
How To Create Temporary Login Credentials For WordPress
It’s really important to know how to create temporary login credentials For WordPress if you are running a WordPress Website.
Temporary login credentials help to set a temporary WordPress account that automatically expires after a given time.
Sometimes you will need to create temporary login credentials to give access to your WordPress dashboard to your developer or theme and hosting support team.
In that case, if you know how to create temporary login credentials for WordPress, you won’t need to give access to your actual user ID and password, and dashboard URL.
When Do You Need To Create Temporary Login Credentials For WordPress?

If you are a beginner, you may need to hire developers to work on your website. In that case, the developer will need to get access to your admin area to edit or check your issues.
If you think the developer is trustworthy, you can create an administrator account for them and you can delete the account when they have done their job.
Sometimes, you may forget to delete the account you have created for them. This problem can create a serious issue for you later. You can face serious security threats and data safety issues.
In that case, you can create temporary login credentials that required no password and will be disabled automatically after a given time.
Now let’s see how to create temporary login credentials for WordPress without any password.
How To Create Temporary Login Credentials For WordPress
You can simply create temporary login credentials by installing a plugin on your WordPress. There is a simple WordPress plugin that is lightweight and won’t slow down your site. The plugin name is Temporary Login Without Password.
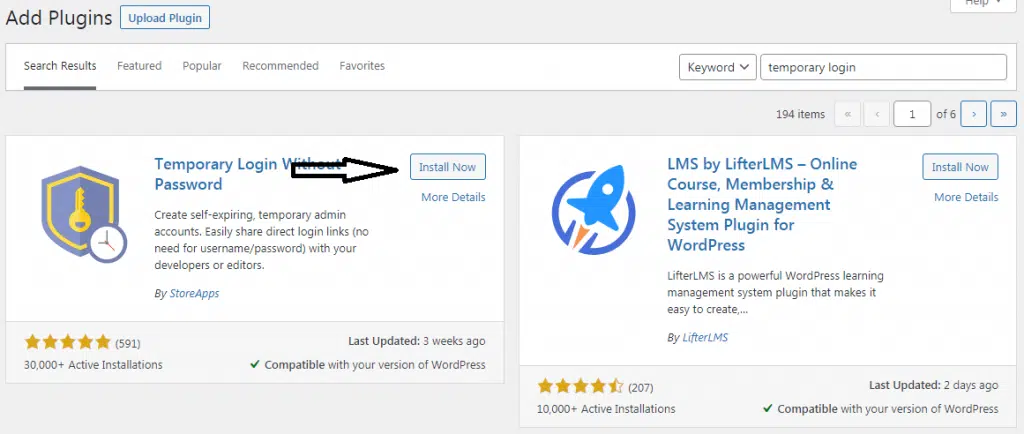
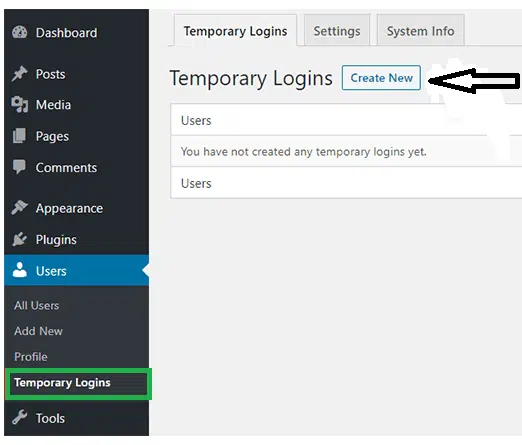
After install and the activation of the plugin, directly go to Dashboard>>Users>>Temporary Logins and click on the create a new button to add your new temporary login account.
When you will click on the add new option, it will show a form where you will need to enter your information for the temporary login. Simply put your email address, then the first and last name of the user.
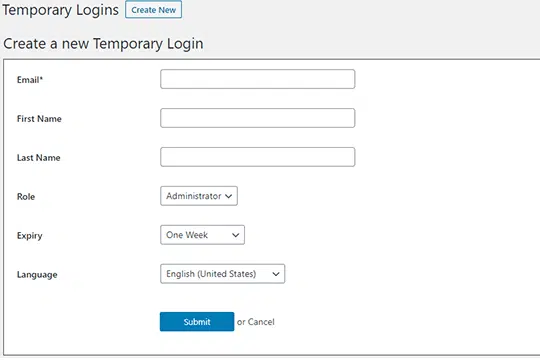
Now, you need to select the user role. You have to be careful while selecting a user role. Read the following role tasks to have an idea of which role you wanna give to your user.
Administrator: This is the most powerful user role. This user can add new posts, edit any of your posts and delete any post. They can even install, edit and delete plugins and change themes. The administrator can change the existing information as well as delete any user even another administrator also.
This role is reserved for the site owner that gives you full control of your WordPress website. If you have multiple websites, you have to be careful to assign anyone as an administrator.
Editor: The editor will have full control of the content section. They can add new content, edit, publish and delete any of your blog posts, even the ones written by other authors.
You can assign an editor to moderate, edit and delete comments also. The editor doesn’t have any access to WordPress settings, installing plugins, and changing themes except the content section.
Author: The author’s role get access to write, edit and publish their own blog posts. They can also delete their own posts, even after the content is published. The author can not create any categories. But they can assign their content in the existing categories.
Contributor: The contributors can add new posts and edit them. But they are not allowed to publish any post. Not even their own posts. The contributors can not upload any files, moderate or delete any comments, don’t have any access to settings, plugins, and themes.
Subscriber: This role let your user log into your WordPress site and update their user profiles. They can also change their password. This user can not write posts, view comments, or anything else on your WordPress dashboard. This role is useful if you want your users to log in to read a post or leave a comment on your post.
I hope now you know in which role you need to assign your user.
Don’t forget to set an expiry duration. So that the temporary account automatically gets disabled. Don’t forget to save the changes.
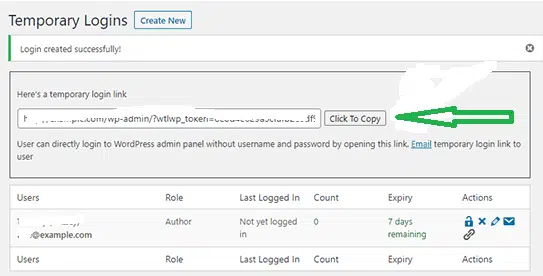
Once you have saved the changes, you will see a success message and URL. Now you can share your URL with the user you want.
They can simply log into your WordPress dashboard with temporary login credentials without any password. And the login will be expired automatically after a period of time if you set an expiry time.
How To Manage Temporary Login Credentials
This plugin is extremely easy and beginner-friendly. You can easily manage your temporary logins using this plugin. Just go to the Users>>Temporary Logins page and you will find here the temporary login credentials you have created on your site.
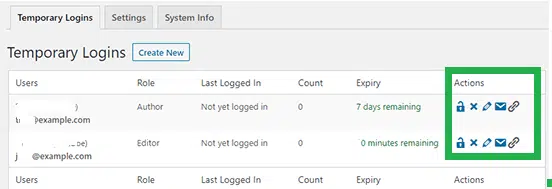
You can see here everything of your assigned users such as the last login date, the role of your users and even the remaining period of time.
This option will let you to expire any user before it’s expiry or even delete the account, edit the user email or even the login URL.
If you delete the temporary account, the content created by the users like posts or pages will show under the administrator account as an author.
I hope now you know how to create temporary login credentials for WordPress without any password. Please share this with your friends if you love this content and let them know how to create temporary login credentials for WordPress.
![5 Best Free WordPress Author Box Plugins [2024 Edition]](https://facileway.com/wp-content/uploads/2021/01/Free-WordPress-Author-Box-Plugins-To-Add-Author-Bio.png.webp)
![How to Add an Author Info Box in WordPress Posts [Easy Hacks]](https://facileway.com/wp-content/uploads/2020/12/How-to-add-an-author-info-box-in-WordPress-Posts-768x432.png.webp)
Hey,
It was really amazing here before I don’t know about this. It would be really useful for me. Useful Stuff’s in it. For What Purpose to create temporary login credentials for wordPress
I am glad you have found this content useful!